Proverbial Cat
  • Home
  • About Me
  • Resident Cats
    • Galen
    • Duncan >
      • Arwen
    • Caitlyn
    • Kieren
    • Liam
    • Photo Gallery
    • The Cat Tree
  • Foster Cats
    • Background
    • 2008 >
      • April 2008
      • May 2008
      • Fall 2008
      • Winter 2008/2009
    • 2009 >
      • Spring 2009
      • Summer 2009
      • Fall 2009
      • New Year's Eve 2009
    • 2010 >
      • Suumer 2010
      • Fall 2010
    • 2011 >
      • January 2011
      • Winter 2011
      • Spring 2011
      • Summer 2011
    • Summer 2012
    • Summer 2020
  • Writing Samples
    • Grace Murray Hopper
    • The Stirrings of Nationhood
    • The Supreme Court
    • Service School Command
    • Being a Cat Foster
  • Family Tree
    • My Roots
    • First Generation
    • Second Generation
    • Third Generation
    • Fourth Generation
    • Fifth Generation
    • Headstones
    • Sources
  • Blog
My Blog

Gluten Free Pot Stickers

10/2/2011

0 Comments

 
Picture

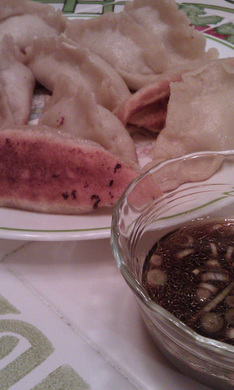
One dish that I haven't had since before I went gluten free (about a year and a half ago) has been pot stickers. I love pot stickers. There was a Chinese restaurant I use to pass on the way home from work and many's the time I would call ahead and pick up an order of pot stickers to go. So, when I saw a new cookbook that was due to be published in August of 2011, I put it on my wish list of books to get. I was so excited when it finally came out. On the cover of the book was....pot stickers!

So, natch, the first thing I had to make was...pot stickers. Granted, it would mean making the dough for these delectable dumplings from scratch but, I figured it would be worth it. I finally managed to set aside enough time to devote to the preparation of this long awaited and much desired meal.

And they were fantastic!

​
The book is The Gluten-Free Asian Kitchen and includes recipes for most of the common sauces used in Asian cooking. A god-send for someone who is not just gluten but also soy intolerant. I was able to substitute coconut aminos for the soy sauce in the dipping sauce. 

Picture
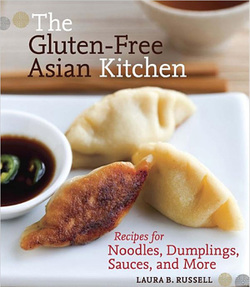
I also substituted chopped green onions for the jalapeño/red pepper flakes since I'm a complete wuss when it comes to spicy foods.

While my pot stickers weren't as neatly formed as the ones in the book, they were close enough for my needs and more importantly they tasted like the wheat based ones I use to buy from that Chinese restaurant.

I will say that the original instructions had you go through several (in my opinion) unnecessary steps when forming the wrappers. They must also have made theirs a lot smaller than mine since the recipe claims to make 28 pot stickers and I ended up with 11. However, based on the amount of filling they said to put into each wrapper, I don't see how they could have managed to make the wrappers any smaller than I did. When I tried using smaller portions, it made the dough thinner and would tear too easily. You can also chuck part of it up the fact that I'm kinda lazy when it comes to baking. I'm not a fussy person and perfection goes against my grain.

Instead of dividing the dough into two sections, rolling each into a rope and cutting into 14 pieces each before rolling out into a disk, I just pinched off a small piece, rolled it into a ball, flattened and rolled out to the appropriate size to fit around the filling. Since the dough is prone to drying out, I figured the less handling, the better. I was also concerned about rolling the dough too thin and having it tear.

So far, though, I have to say I love this book. If you have to be gluten free (and even if you don't) and want to learn how to make your own Asian dishes from scratch, then I highly recommend you get this book.

Recipes reprinted with permission from The Gluten-Free Asian Kitchen: Recipes for Noodles, Dumplings, Sauces, and More. Copyright © 2011 by Laura B. Russell, Celestial Arts, an imprint of Ten Speed Press and the Crown Publishing Group, Berkeley, CA. Photo Credit: Leo Gong.

Pot Stickers
Ingredients:
  • ½ cup tapioca flour (also called tapioca starch)
  • ½ cup millet flour
  • ½ cup sweet rice flour, plus plenty more for rolling out the dough
  • 1½ teaspoons xanthan gum
  • ¾ teaspoon salt, divided
  • ½ cup boiling water
  • 2 tablespoons cold water
  • ¾ pound ground pork (I had about 1/4 of a pound left over that I couldn't fit into wrappers so you might want to start off with just ½ a pound at first--unless you want to take the time and effort to try and make the number of wrappers stated in the recipe.)
  • 3 green onions, white and green parts, minced
  • 1 tablespoon minced fresh ginger
  • 2 teaspoons GF soy sauce* or tamari (or use coconut aminos if you're allergic to soy)
  • ½ teaspoon toasted sesame oil
  • ¼ teaspoon freshly ground black pepper
  • 3 tablespoons vegetable oil, divided
  • Soy Vinegar Dipping Sauce for serving
Directions:
  1. Stir together the tapioca flour, millet flour, sweet rice flour, xanthan gum, and ½ teaspoon salt in a bowl.
  2. Add the just-boiled water and stir with a fork to combine.
  3. Add the cold water and mix well until a dough starts to form. Use your hands to knead the dough together a few times-you can do this right in the bowl-and then form the dough into two balls. Transfer the dough to a large resealable bag until ready to use, up to several hours. The dough will dry out quickly; make sure it stays covered.
  4. In a second bowl, combine the raw pork, green onions, ginger, soy sauce, sesame oil, remaining ¼ teaspoon salt, and pepper. Mix well to combine.
  5. To form the dumplings, dust your hands, the counter, and a baking sheet with sweet rice flour.
  6. Roll one piece of the dough into a long rope, about ¾ inch thick. (Note: I started trying to do this but quickly became frustrated -- did I mention I'm inherently lazy? -- this is where decided to just pull off appropriately small pieces and skip to Step 9.)
  7. Cut the dough into 14 pieces and put them back into the resealable bag.
  8. Repeat with the other ball of dough for a total of 28 pieces.
  9. Keep plenty of sweet rice flour nearby (up to ½ cup) for dusting the counter and the rolling pin to prevent the dough from sticking. Working with one piece of dough at a time, flatten the dough into a circle with the heel of your hand.
  10. Using a small rolling pin-a small dowel works best (I had neither so just used my regular marble rolling pin)-roll the dough into a 3- to 3½-inch circle, turning the dough periodically to prevent sticking. (Alternately, put the dough between two pieces of plastic wrap and roll it into a circle.)
  11. Transfer the dumpling wrappers to the prepared baking sheet. Repeat with the remaining dough. (If you run out of space on the baking sheet, make a second layer separated by plastic wrap.)
  12. Dust a dinner plate with sweet rice flour.
  13. Spoon a scant tablespoon of filling into the center of each wrapper.
  14. Dip two fingers in a small bowl of water and run them around half the circumference of each circle. (This is so the wet side can stick to the dry side.)
  15. Lift the sides, forming a half-moon shape around the filling; keep the bottom flat against your hand or the counter.
  16. Pinch the dough together at the top and then form two or three pleats along each side; press to seal. (Alternatively, if you have a dumpling press, use it to form and seal the dumplings.)
  17. Transfer the dumplings to the prepared plate.
  18. Cover tightly with plastic wrap and refrigerate until ready to cook, up to 4 hours ahead.
  19. In a large nonstick frying pan, heat 1½ tablespoons of the oil over medium-high heat.
  20. Add half the dumplings to the pan and cook until browned on the bottom, 2 to 3 minutes.
  21. Holding the pan lid in one hand (to control splattering), add 1/3 cup water to the pan and immediately cover it.
  22. Lower the heat to low and steam the dumplings until cooked through, 8 to 10 minutes.
  23. Remove the lid and raise the heat to medium.
  24. Cook until the water evaporates and the bottoms of the dumplings are well browned, about 2 minutes longer.
  25. Repeat with the remaining dumplings and oil.
  26. Serve hot with the dipping sauce or a bowl of soy sauce.
Note: If you do not plan on eating the dumplings all at once (reheating them is fine, not great), freeze some of the uncooked dumplings for later. Freeze the dumplings on a plate or tray before transferring them to a freezer bag to keep them from sticking together. Add the dumplings to the pan straight from the freezer and increase the steaming time by 2 minutes.

Soy Vinegar Dipping Sauce
Ingredients:
  • ¼ cup GF soy sauce* or tamari (or coconut aminos)
  • 3 tablespoons unseasoned rice vinegar
  • ½ teaspoons sugar
  • 1 teaspoon toasted sesame oil
  • 2-3 slices fresh jalapeño, or large pinch of red pepper flakes (optional) (I used chopped green onion instead)
Directions:
Stir together all the ingredients in a small serving bowl. The
dipping sauce will keep, covered, in the refrigerator for about
1 week with fresh jalapeno or 2 weeks with red pepper flakes.

*Note: Not all soy sauce is created equal. Most commercial brands in the U.S., unless they specifically say they are wheat/gluten free are not safe for anyone who is gluten intolerant. So check the label. There are a number of brands (San-J, La Choy, Chung King, and Eden Brand) that offer a gluten free version of their soy sauces. Tamari sauce is naturally gluten free (but be careful and double check the label as some types of shoyu that have gluten have been marketed as Tamari).

I prefer the less spicy taste of the green onions. It provides just the right amount of zing without making it too hot. I could have eaten the entire amount in one sitting but I decided to reserve half for a second meal.


0 Comments

Your comment will be posted after it is approved.


Leave a Reply.

    About the Author

    I'm a tech writer who loves animals and fostering homeless cats and kittens. After being diagnosed with non-celiac gluten sensitivity (NCGS), I adopted a Paleo/Keto lifestyle to improve my diet and repair my gut. I have a passion for learning and sharing that knowledge with others (probably why I became a tech writer in the first place). My interests range from cooking, scrapbooking, and animal welfare to home improvement, genealogy, and photography. This blog will likely cover a wide variety of topics as the mood hits me.

    Paleo Blogs
    The Paleo Mom
    Paleo Parents
    PaleOMG
    Primal Palate
    Danielle Walker
    Nom Nom Paleo
    Ditch the Wheat
    Holisitically Engineered
    Slim Palate
    Balanced Bites
    Paleo Savvy
    Elana's Pantry
    Food Renegade
    Mark's Daily Apple
    Keto Blogs
    Low Carb Yum
    All Day I Dream About Food
    Keto Cooking Christian
    My Life Cookbook
    Keto Bakes
    The Castaway Kitchen
    Real Balanced
    Gnom-Gnom
    Mad Creations
    My Montana Kitchen
    Ditch the Carbs

    Archives

    February 2016
    March 2015
    July 2014
    December 2012
    April 2012
    February 2012
    October 2011
    September 2011

    Categories

    All
    Animals
    Animal Welfare
    Babylon 5
    Baking
    Bread
    Cats
    Celiac Disease
    Cooking
    Gluten Free
    Gluten Sensitivity
    NCGS
    Rescue
    Science Fiction
    Volunteering

    RSS Feed

    Flickr Photos

    Visit Janet's profile on Pinterest.
Copyright © 2023 Janet Potts
  • Home
  • About Me
  • Resident Cats
    • Galen
    • Duncan >
      • Arwen
    • Caitlyn
    • Kieren
    • Liam
    • Photo Gallery
    • The Cat Tree
  • Foster Cats
    • Background
    • 2008 >
      • April 2008
      • May 2008
      • Fall 2008
      • Winter 2008/2009
    • 2009 >
      • Spring 2009
      • Summer 2009
      • Fall 2009
      • New Year's Eve 2009
    • 2010 >
      • Suumer 2010
      • Fall 2010
    • 2011 >
      • January 2011
      • Winter 2011
      • Spring 2011
      • Summer 2011
    • Summer 2012
    • Summer 2020
  • Writing Samples
    • Grace Murray Hopper
    • The Stirrings of Nationhood
    • The Supreme Court
    • Service School Command
    • Being a Cat Foster
  • Family Tree
    • My Roots
    • First Generation
    • Second Generation
    • Third Generation
    • Fourth Generation
    • Fifth Generation
    • Headstones
    • Sources
  • Blog