 Gluten free bread using powdered milk Gluten free bread using powdered milk When you have to go gluten free as I do, the one food item that seems most elusive to recreate in a gluten free form is bread. Cakes and cookies are a breeze to make gluten free and not miss the gluten. Bread is a much more delicate creature. The gluten in wheat flour has a magical quality when used in bread. It's what gives bread the elasticity and rise we've come to love in a good loaf. After being diagnosed with non-celiac gluten sensitivity, I had begun to experiment with both commercially made breads as well as home made varieties. While I managed to get things that looked like bread, taste and consistency were another matter. Most breads were dry and crumbled into tiny pieces if used untoasted. And while I like toast, there are some times when I want a regular, soft, flavorful piece of bread to make a sandwich with. Finally, last spring, I ran across Silvana Nardone's recipe, Isaiah's Gluten-Free Sandwich Bread. At long last! A bread that was moist, delicious and didn't crumble into a thousand pieces. I can make up a loaf on Sunday and still have slices that are edible on Friday that don't need to be toasted. That's the thing about most gluten free breads, after the first day, they are only palatable when toasted. Now, I could finally have sandwiches every day for lunch. There are a couple of tricks to making good gluten free bread. The first is the recipe, of course. But in addition to that, here are some rules that will help ensure success. Always weigh your ingredients Don't use a measuring cup to measure out gluten free flours. Because foods settle, you can end up getting up to 50% more of an ingredient than the recipe calls for if you measure it rather than if you weigh it. Flours are no different. A cup of sifted flour will weigh a lot less than a cup of flour that has been allowed to settle, particularly so if you're one of the scoop and level folks, that adds to the compaction. With bread, the ratios of wet to dry ingredients are key to getting a good result. Weighing the ingredients will ensure consistent results. Silvana's recipe gives the amounts in both volume and weight. I say, skip the volume and always use weight. The United States is one of the few countries that relies on volume measurements in their recipes. Europeans have already discovered the increased accuracy in weighing foods vs. measuring them. So, what if you don't have a kitchen scale? The simplest answer is buy one! They are not expensive and after using it awhile, you'll wonder how you did without it. If you absolutely must use measuring cups then whatever you do, don't scoop with the measuring cup and level the ingredients. Use a large spoon or a kitchen scoop and pour the flour into your measuring cup and level. Don't let your bread rise in a pre-heated oven I know a lot of cooks will tell you to preheat your oven to its lowest temperature (about 200°), turn off the oven and put your bread in there to rise. Frankly, that's too hot an environment. The bread will rise too quickly and is almost guaranteed to fall during the cooling phase. Gluten free bread needs to rise more slowly and not too high before baking. Without gluten to support the structure, the bread can't sustain the height. If you need a warm, draft free location, stick the bread in your microwave (but don't turn it on while the bread is in there). If your house is particularly cold, you can take a glass of water and nuke it for no more than a minute before putting the bread inside. When I make Isaiah's Bread, I only let it rise slightly above the level of the pan. It will continue to rise as it bakes. In so doing, the crust is able to properly form and support the final height of the bread. Let your ingredients come to room temperature before starting Yeast is a very sensitive thing. If your ingredients are too cold at the start it will inhibit the growth of the yeast and therefore the rise of your bread. As gluten free flours are best stored in either the refrigerator or freezer to prevent them from going rancid, you will need to plan ahead to ensure they are at room temperature when you are about to begin. To speed up the process you can microwave them for a few seconds after you have measured them out (no need to heat up the rest of the flour that isn't being used). Make sure you don't overheat the flour because that can also adversely affect the yeast. For eggs, set them in a glass of warm water, but not too hot otherwise they may start to cook in the shell. Recipe I made a few alterations to the recipe that I thought improved the texture, longevity and/or nutritional profile. (Note: for the original recipe and pictures of each step, see Silvana's article) Ingredients:
Directions:
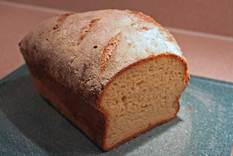
Note: the bran/rice flour mixture sprinkled on the top and three diagonally slices in the loaf are merely to add to the artisan appearance of the loaf and are optional. I will often make up several batches of the dry ingredients and store them in a ziplock back in the refrigerator. It saves a little time in the preparation. 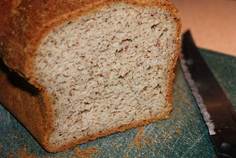 Gluten free bread using Montina™ Gluten free bread using Montina™ Pictured above is the first loaf I made using 85g of organic non-fat powdered milk. To the right is the loaf I made using 85g of Montina™ Baking Supplement. If you like your bread with more fiber, just use the Montina™. If you'd like it with less fiber, use all powdered milk or as I usually do now, about 45g of Montina™ and 40g of powdered milk.
About Expandex™ Expandex™ is a gluten free non-GMO modified tapioca starch that helps improve the texture and longevity of baked foods, especially breads. The process for modification is proprietary but according to one source I read, it involves fermentation rather than chemical treatment. Silvana's recipe did not specifically call for using Expandex™ and will work fine with regular tapioca starch. Also, some people have reportedly experienced "digestive issues" (i.e. diarrhea or vomiting) using it. However, I've never had any problems using it and I know there are lots of others that swear by it. It does improve the texture and longevity of bread, in my opinion. About Montina™ Pure Baking Supplement Silvana's recipe called for whey powder. I looked all around the stores in my area and the only whey powder was the kind in protein drinks that typically had other flavors/ingredients in them. The online sources that I could find required you to buy it by the case. Silvana's other suggestion was to use soy protein powder but I'm allergic to soy, too. The common feature of both whey and soy protein powders is, well, the high levels of protein. While surfing the web for an alternative ingredient that would provide the protein content of the whey powder, I found Montina™ Pure Baking Supplement. Montina™ is made from Indian ricegrass. It's a Native American grass that grows in the plains of the United States. It's naturally gluten free and is high in protein and fiber. Montina™ was developed by the University of Montana to boost the financial security of farmers who were having difficulty making ends meet cultivating more conventional grains like wheat, rye and barley. They needed a grain that was drought tolerant and could grow well in poor quality soil. For more information about Montina™ and their products go the their website: Montina™ Amazing Grains. (Note: as of 2013, this product appears to be no longer available)
2 Comments
|
About the Author
I'm a tech writer who loves animals and fostering homeless cats and kittens. After being diagnosed with non-celiac gluten sensitivity (NCGS), I adopted a Paleo/Keto lifestyle to improve my diet and repair my gut. I have a passion for learning and sharing that knowledge with others (probably why I became a tech writer in the first place). My interests range from cooking, scrapbooking, and animal welfare to home improvement, genealogy, and photography. This blog will likely cover a wide variety of topics as the mood hits me. Paleo Blogs
The Paleo Mom Paleo Parents PaleOMG Primal Palate Danielle Walker Nom Nom Paleo Ditch the Wheat Holisitically Engineered Slim Palate Balanced Bites Paleo Savvy Elana's Pantry Food Renegade Mark's Daily Apple Keto Blogs
Low Carb Yum All Day I Dream About Food Keto Cooking Christian My Life Cookbook Keto Bakes The Castaway Kitchen Real Balanced Gnom-Gnom Mad Creations My Montana Kitchen Ditch the Carbs Archives
February 2016
Categories
All
Flickr Photos
|
 RSS Feed